Mie University Office 365
1. First of all
In order to prevent unauthorized access, the University will also introduce two-factor authentication.
two-factor authentication can be set up in Office 365 by joining a team, so please refer to the setting
instructions.
If you do not have a cell phone or smartphone, you can use a landline phone. In that case, please select
"Voice Call".
However, please note that you will not be able to "sign in" at locations where that landline is not
available.
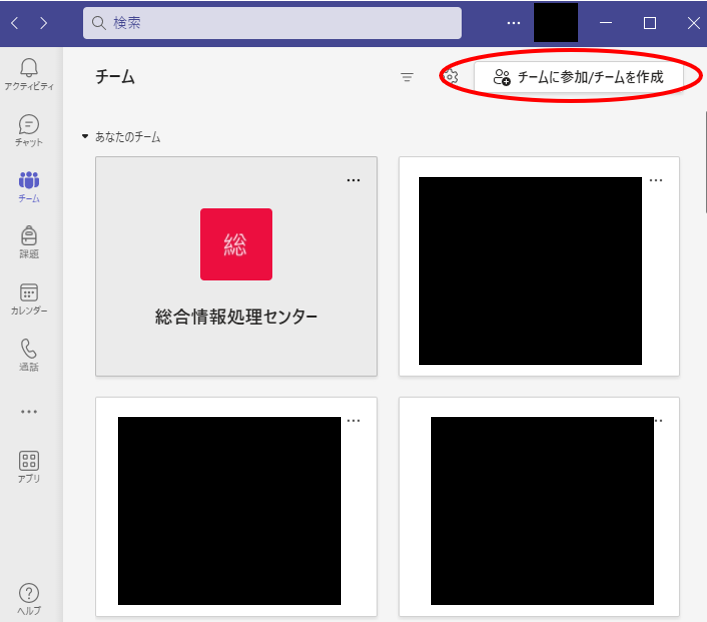
2. Setup Method
Setting up two factor authentication
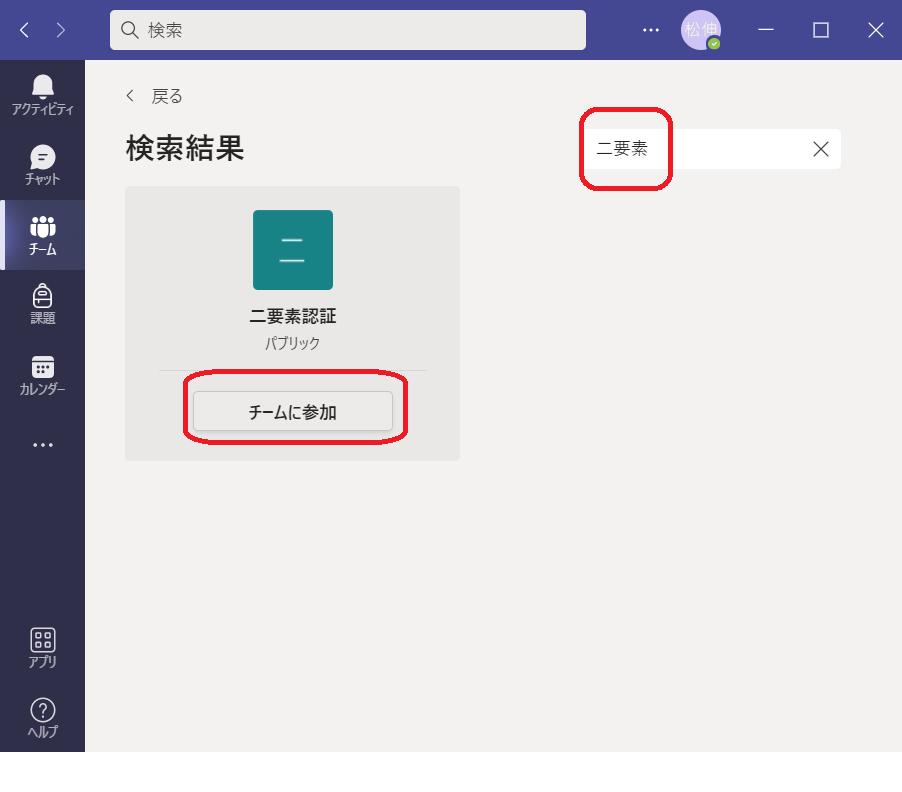
- First you need to join a Teams team called "Two Factor Authentication".
How to use Teams,Mie University Office 365 - How to use Teams -for more information.
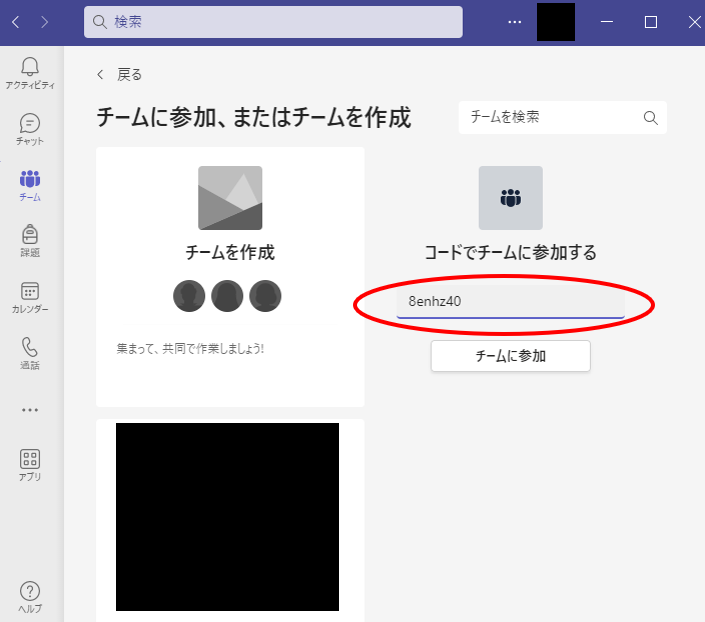
- Enter the code "8enhz40" in the "Join a team with code" field and click "Join a team" to join the "Two
Factor Authentication" team.
※ If you have already joined a "two factor authentication" team, the team screen will appear.
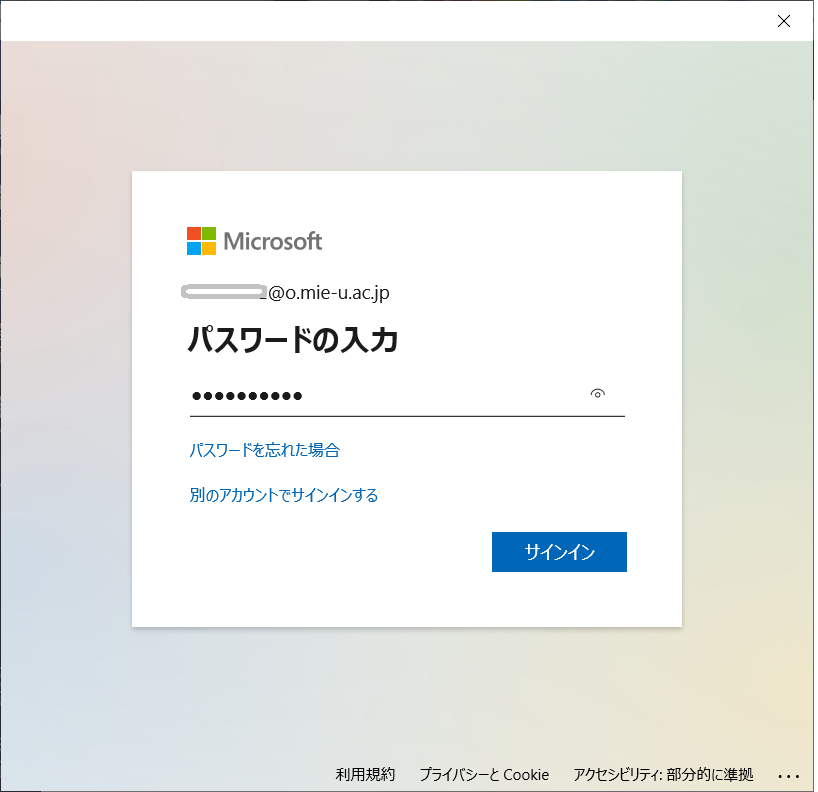
- After waiting for a while, the authentication screen will appear. Enter your unified account password
and sign in.
If you wait and it does not appear,please access Office 365 Portal Site and sign in.

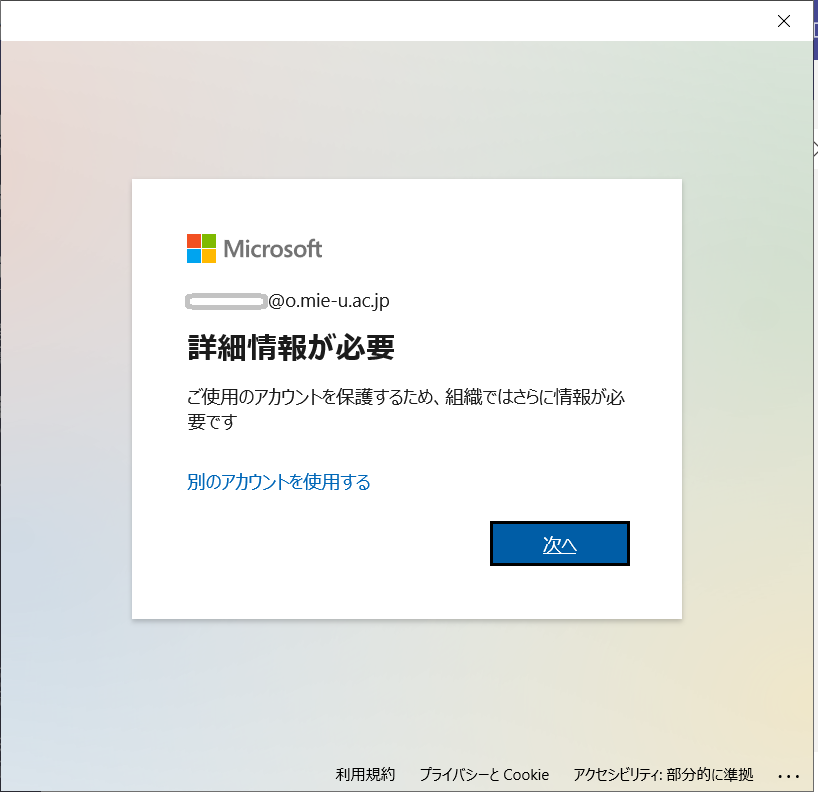
- You will see "More information required." Press "Next."
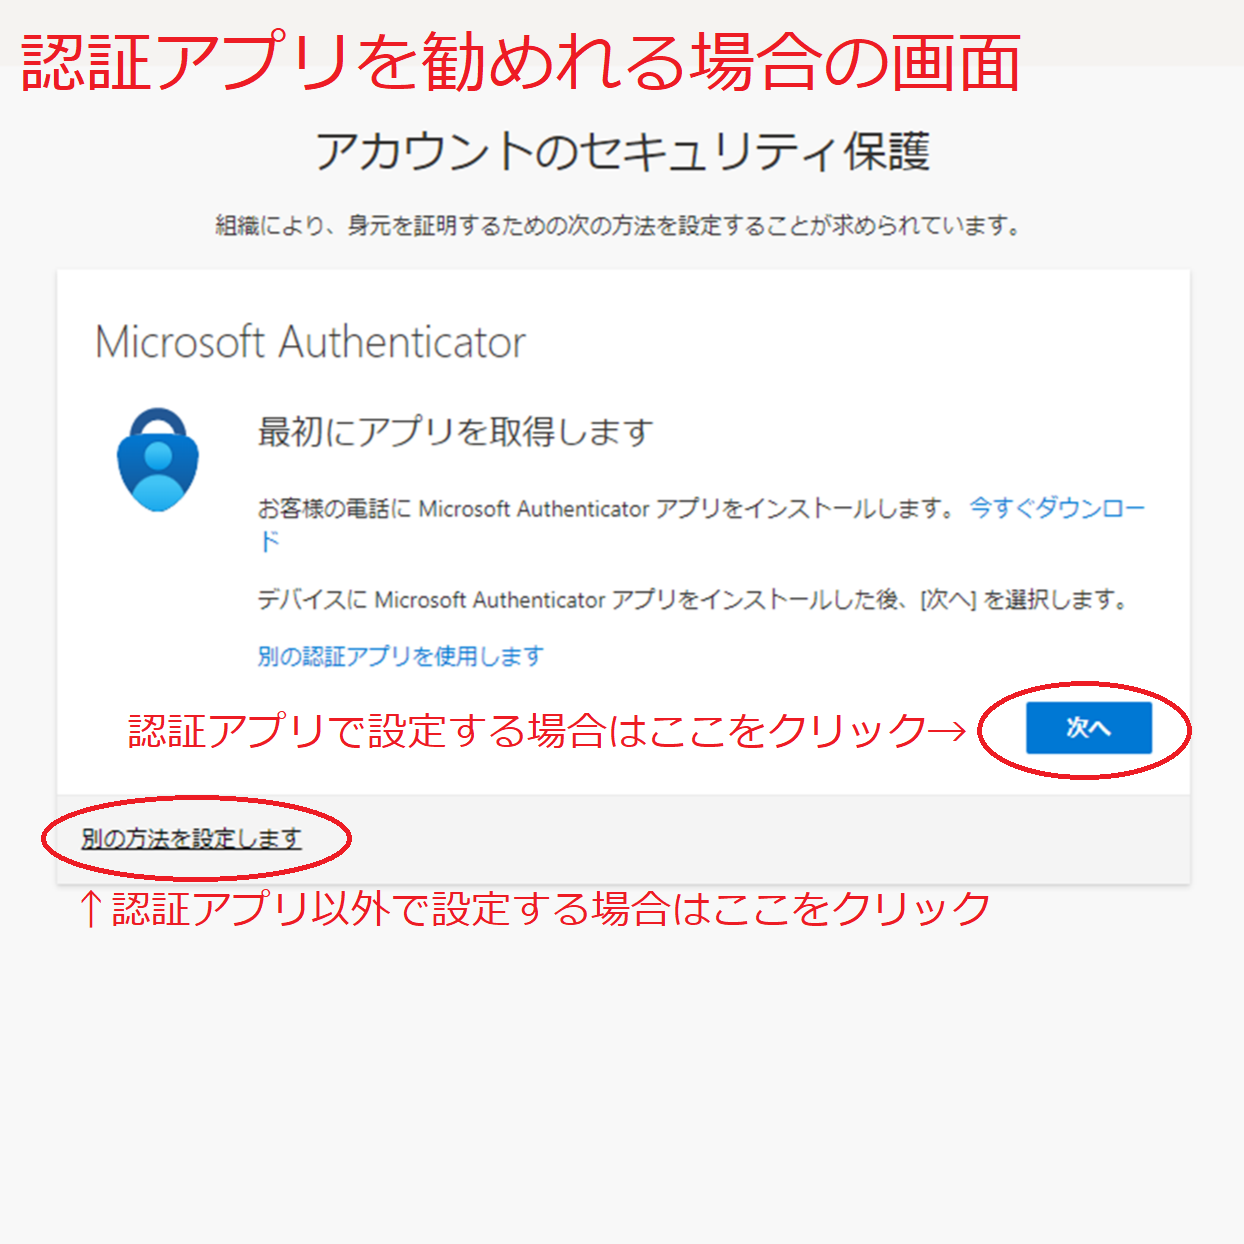
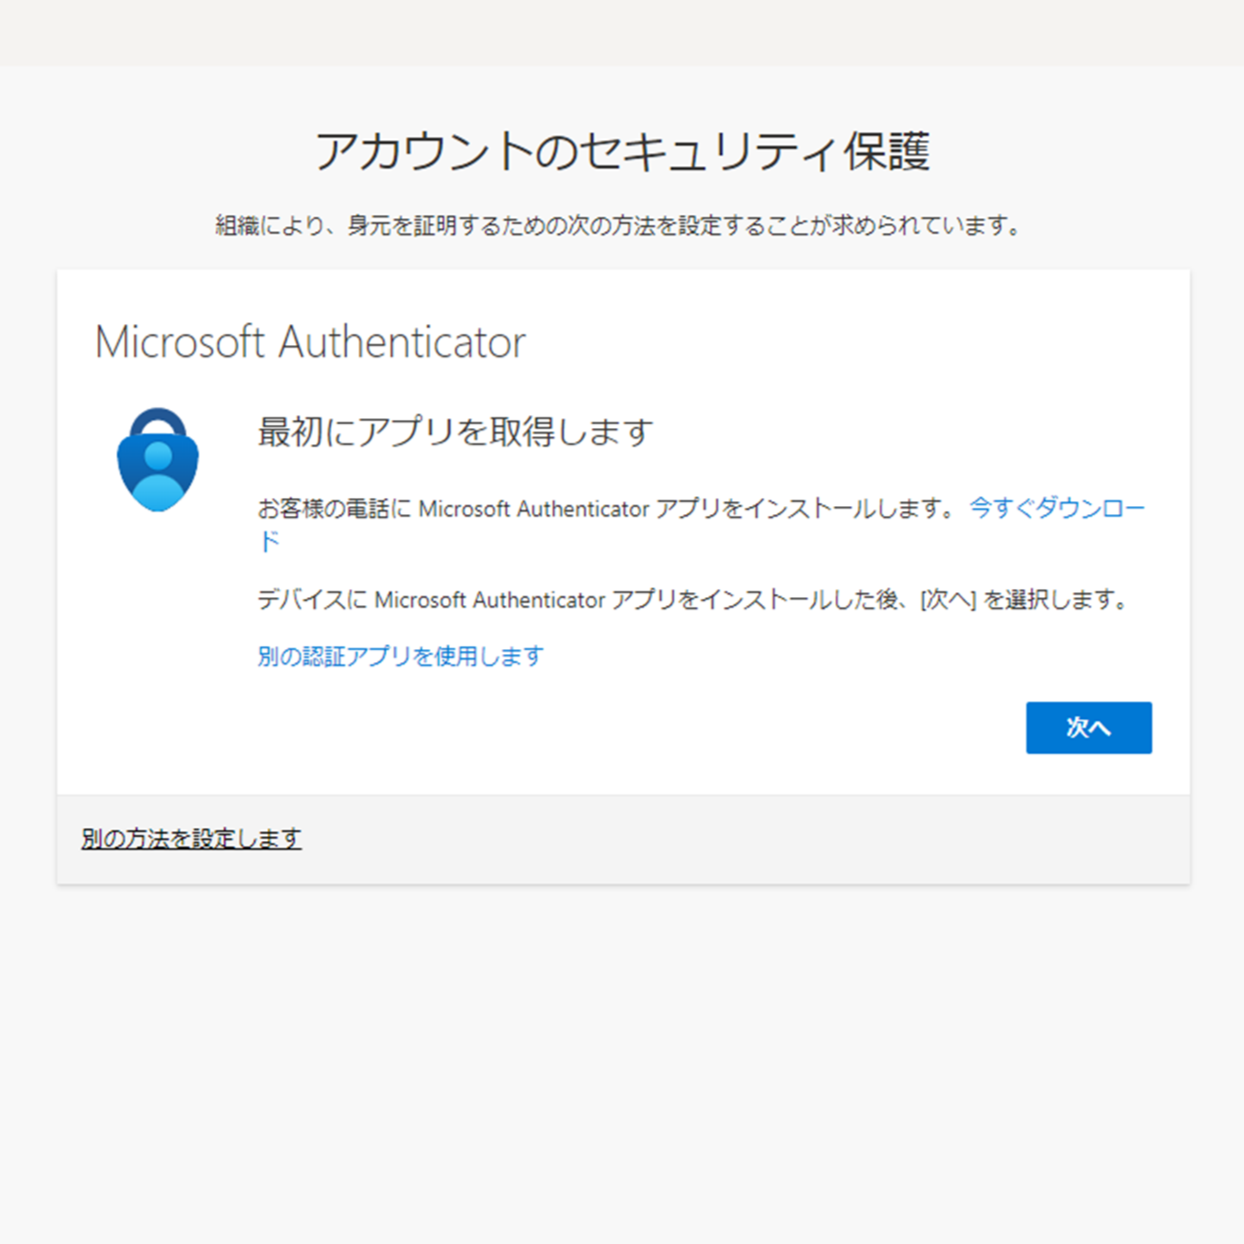
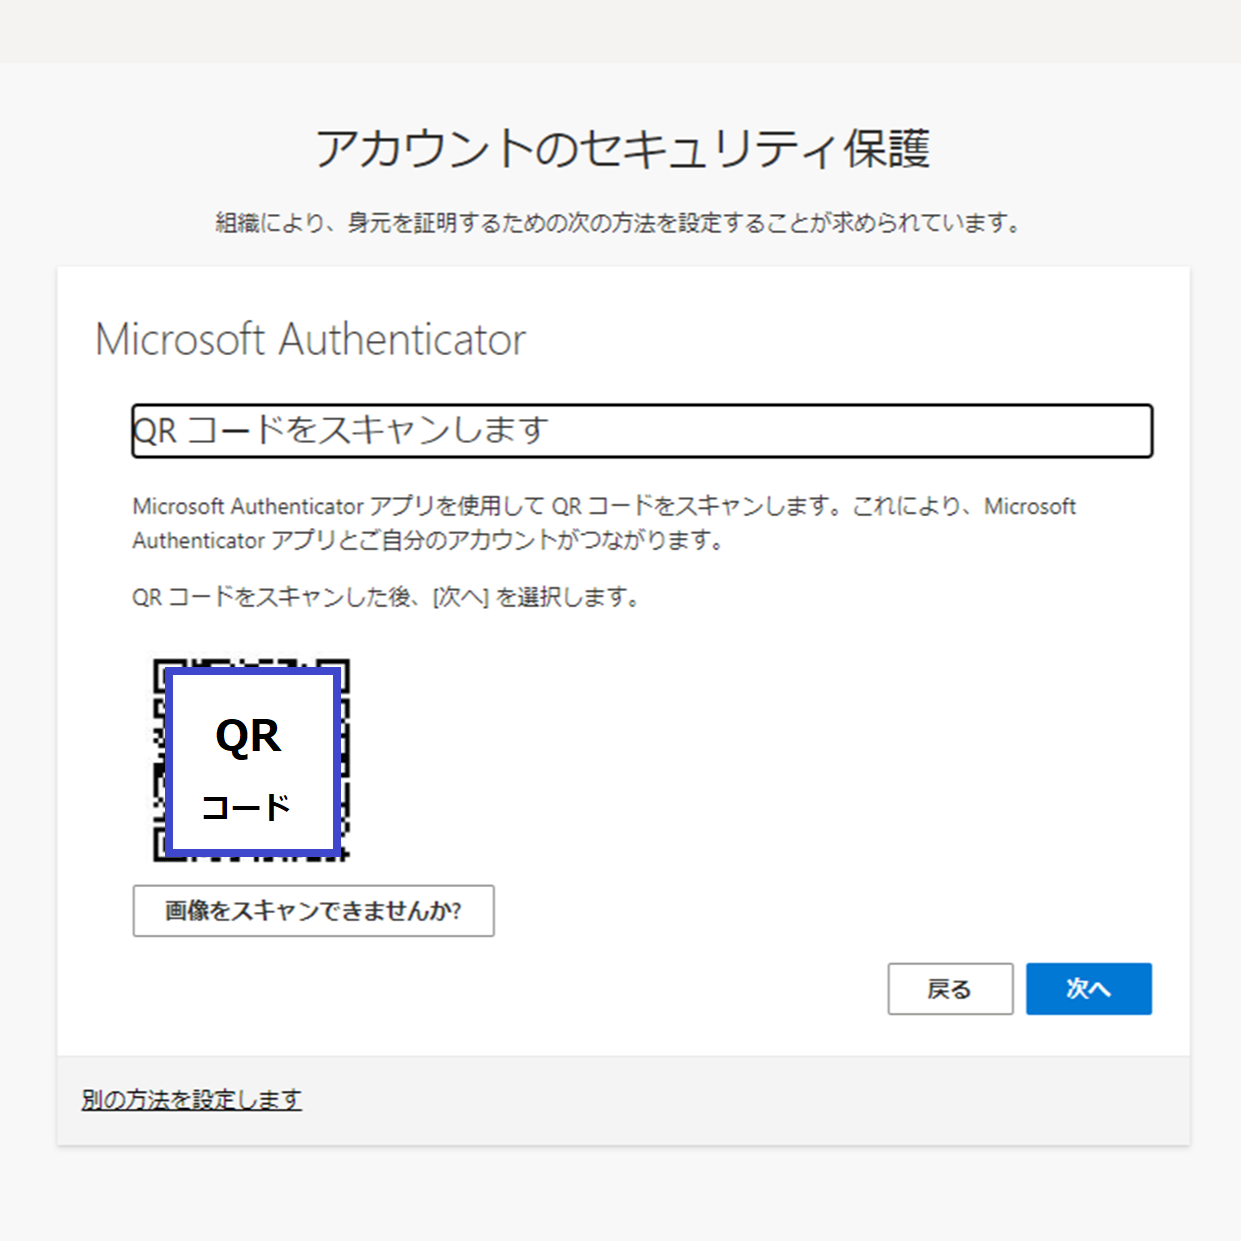
- You will see "Account Security Protection."
If you wish to configure the settings using the authentication application, click "Next". For a description of the setup procedure in this case, see How to set up with Microsoft Authenticator.
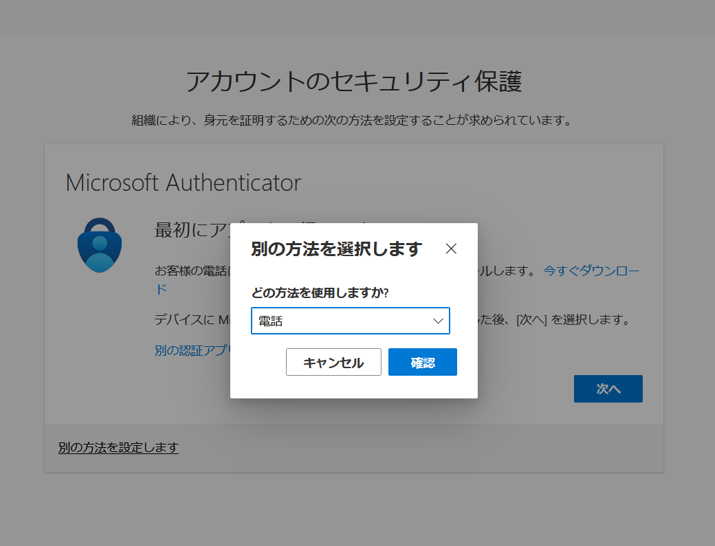
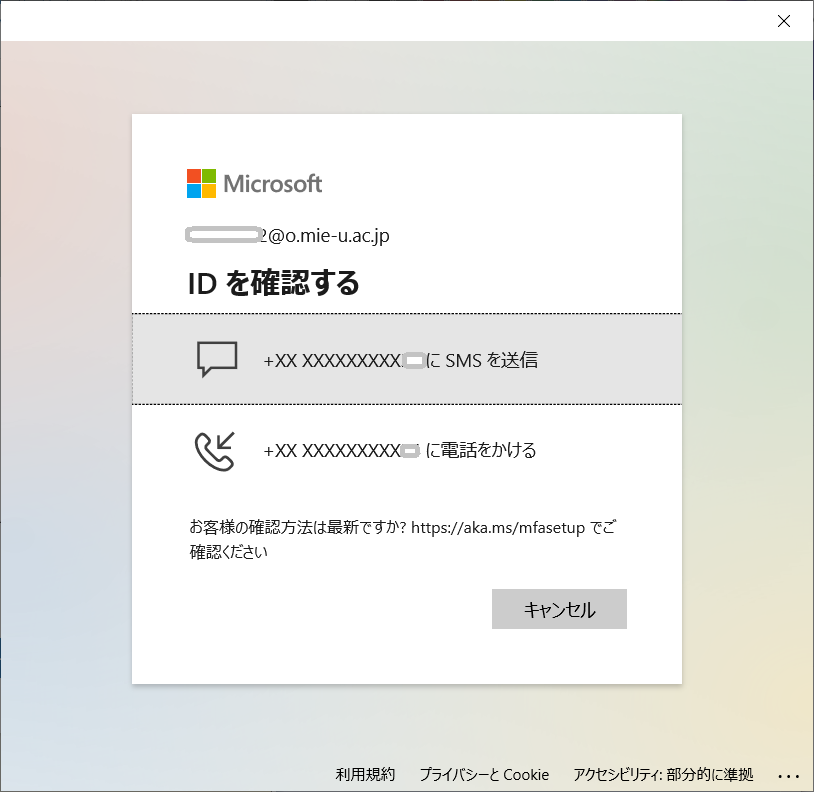
Click "Set up another method" if you wish to configure the settings by phone number (short message).
Please select the method that is easiest for you to use depending on your own usage situation. This section describes the method using text messages over the phone for authentication.
- On the "Choose another method" screen, select "Phone" and click "Confirm."
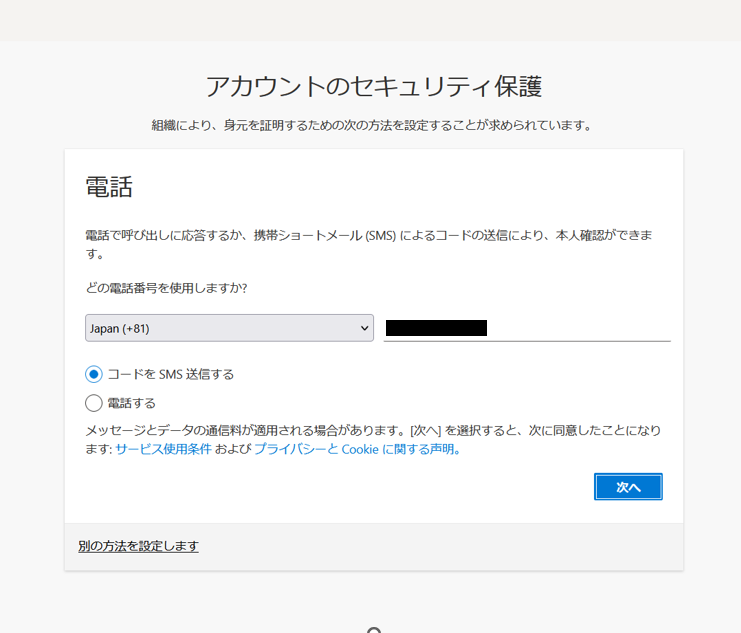
- Select "Japan(+81)" and enter your phone number.
To receive a short message, select "Send code by SMS" and click "Next.
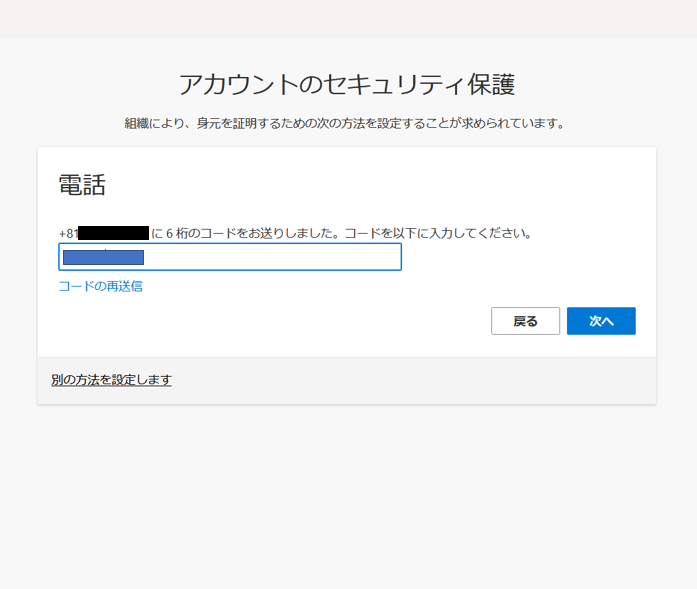
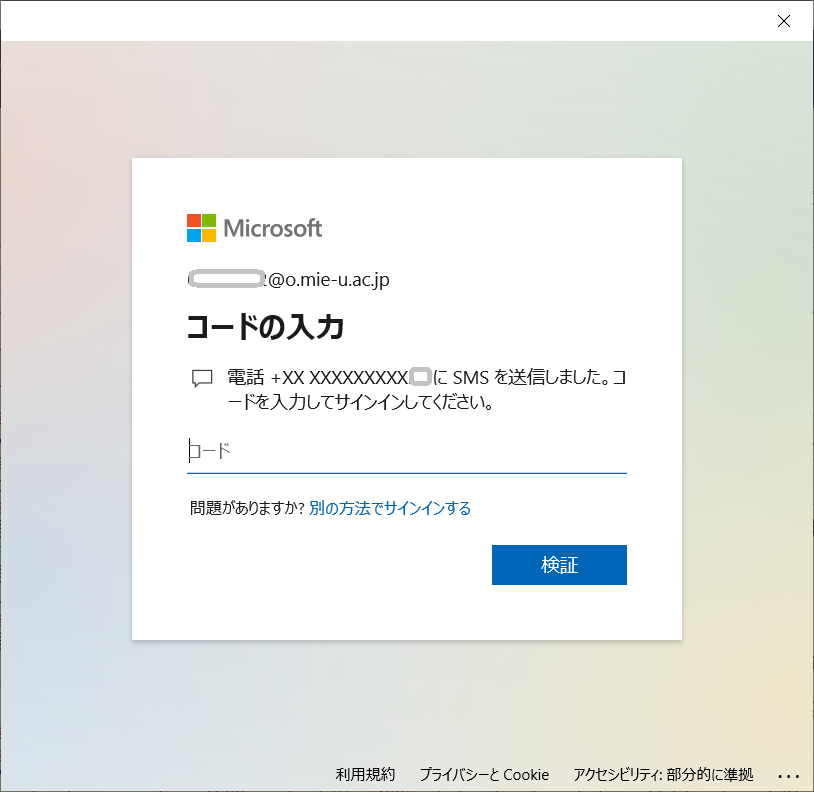
- A confirmation code will be sent to a short message on your phone.
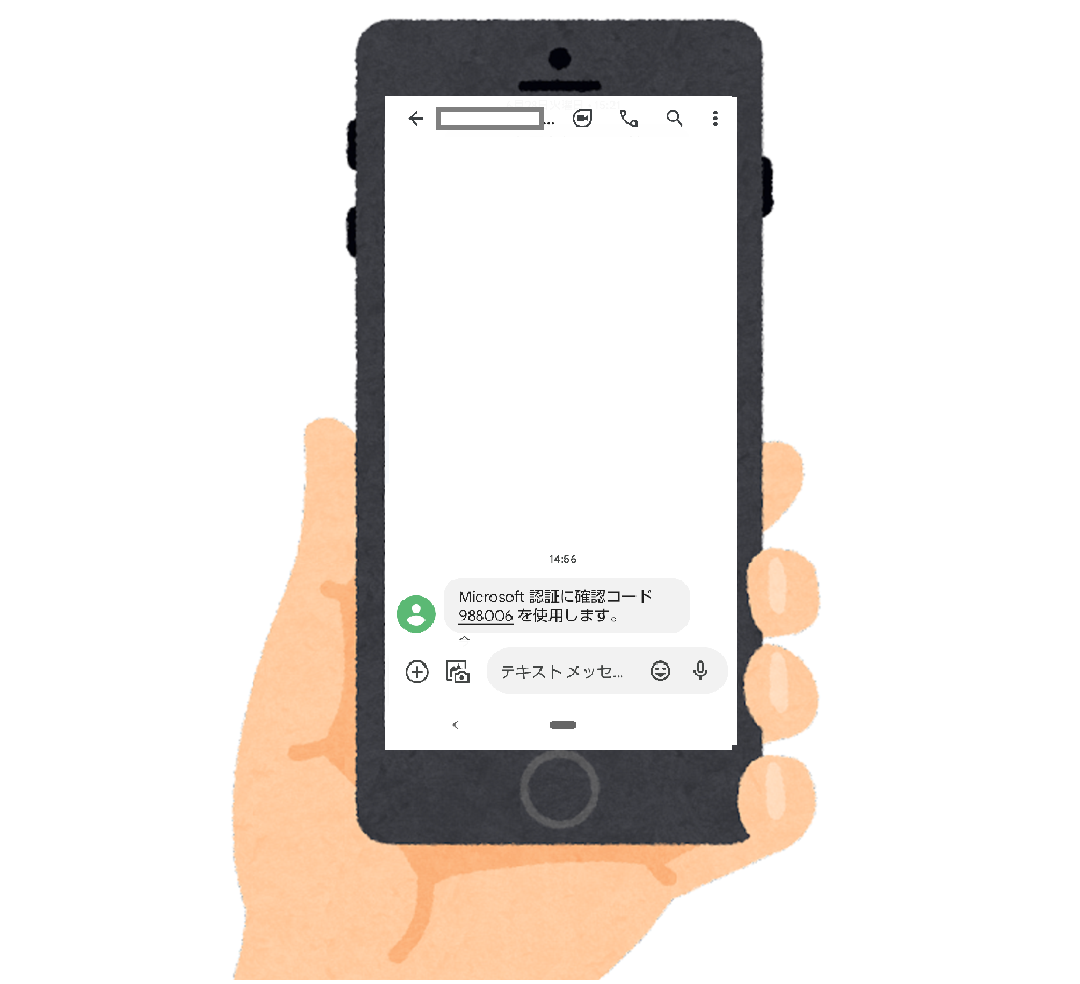
- Enter the confirmation code and click "Next.
- Upon successful authorization, the setup screen will display "Your phone has been successfully
registered." and click "Next".
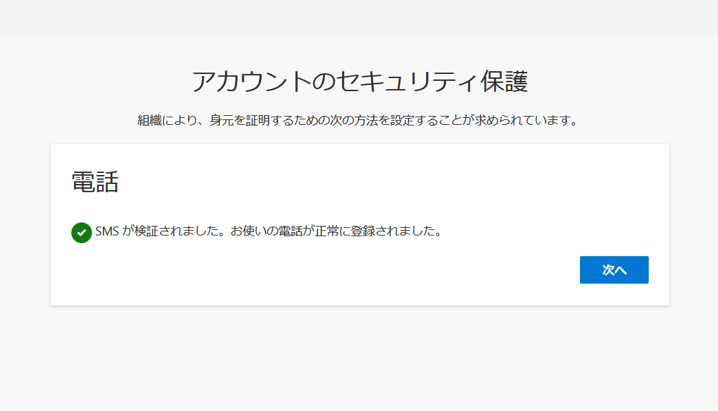
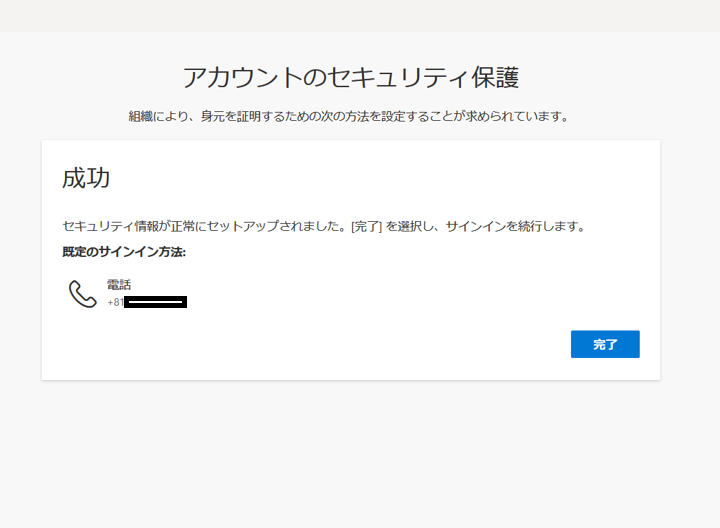
- Click "Done." This completes the setup.
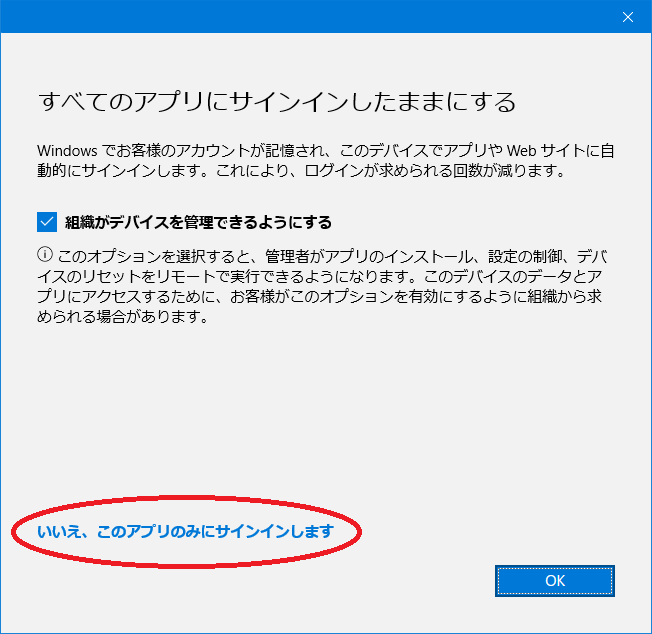
- After clicking "Done," if you see a screen like the followingSelect "No, I
will sign in to this app only."
If you click "OK" with "Allow organization to manage devices" checked, you may get the error "CAA50024".
If that happens, see This page
3. How to check if it is set up
- Launch Edge or other browser, acsess https://mysignins.microsoft.com/security-info.

- Click on the circle in the upper right corner to see which account you are currently signed in
with.
Please make sure that you are able to sign in with your 00000@o.mie-u.ac.jp account (00000 is your student ID number or staff number).
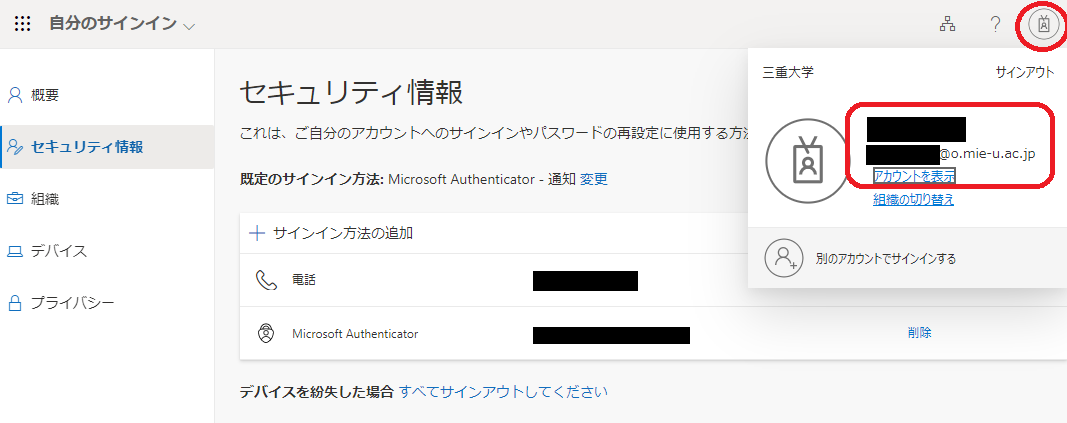
- If two factor authentication has been set up, a column will appear under "Add Sign-In Method".
If you see this, you have successfully set up the system.
If set by phone number, "Phone" will be displayed; if set by authentication application, "Microsoft Authenticator" will be displayed.

4. Sign-in flow after setup
- After signing out of Teams, enter your password and try signing in again.
- You will be prompted to confirm your ID, select Send SMS to XXX and an SMS will be sent to your
registered phone number.
- Enter the 6-digit number from the SMS sent to you.
- If you get a screen like the following, Select "No, I will sign in to this
app only."
If you click "OK" with "Allow organization to manage devices" checked, you may get the error "CAA50024".
If that happens, see this page.
- I was able to sign in.
5. Additional registration or modification of two-factor authentication
- You can register additional two-factor authentication, for example, if you want to register more than
one phone number, access https://mysignins.microsoft.com/security-info
and sign in.
- Click on "Add Sign-In Method."
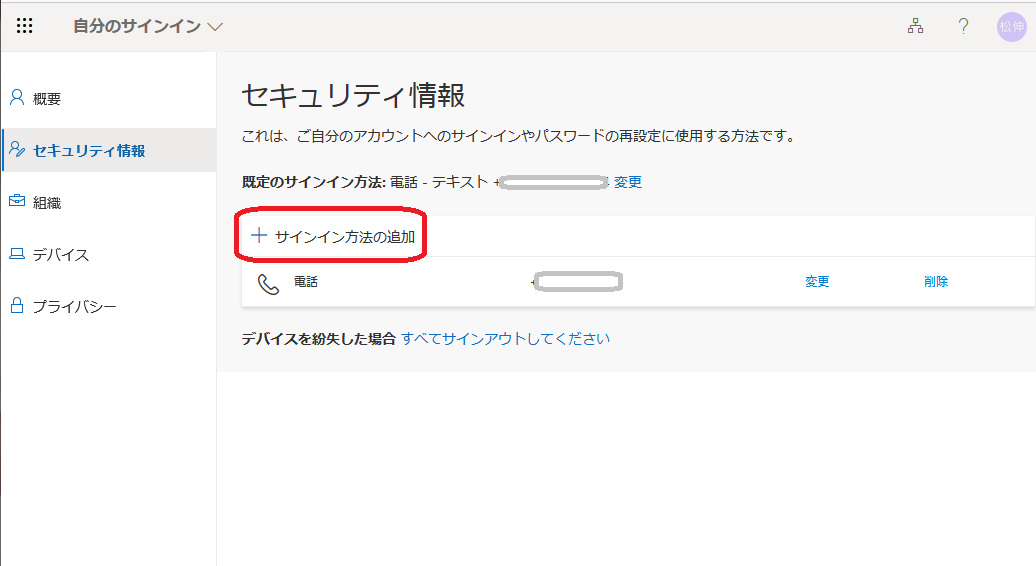
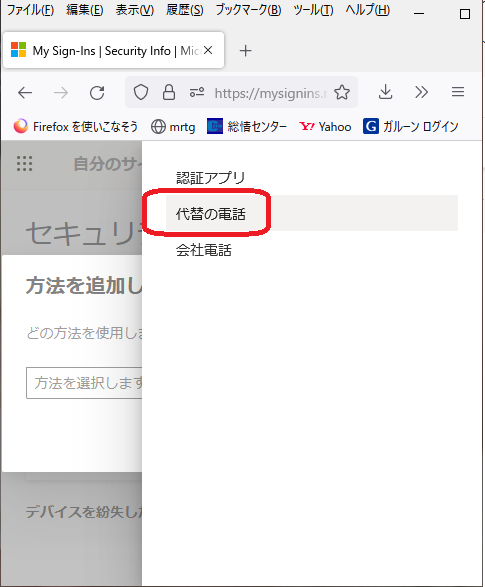
- You will come out when you select a method. Choose the method that is easiest for you to use,
depending on your own usage. Here we will add a phone number.

- Please select an alternate phone.
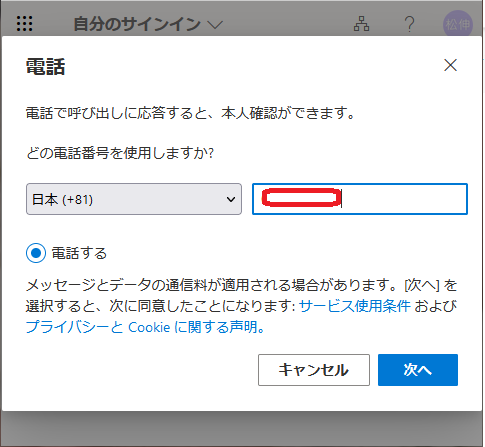
- Select Japan in "Select Region/Country", enter your phone number, and press "Next". The phone will
ring at the number you entered.
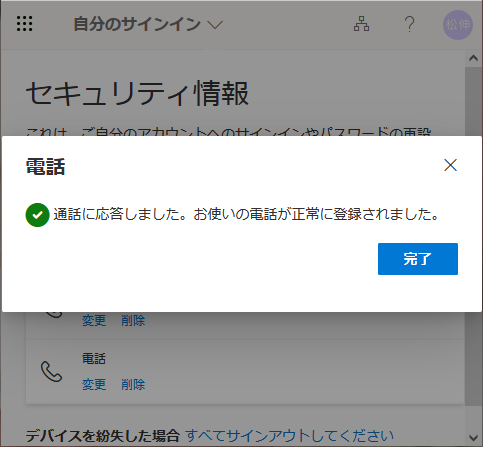
- Follow the instructions on your phone to register. Your phone has successfully registered.
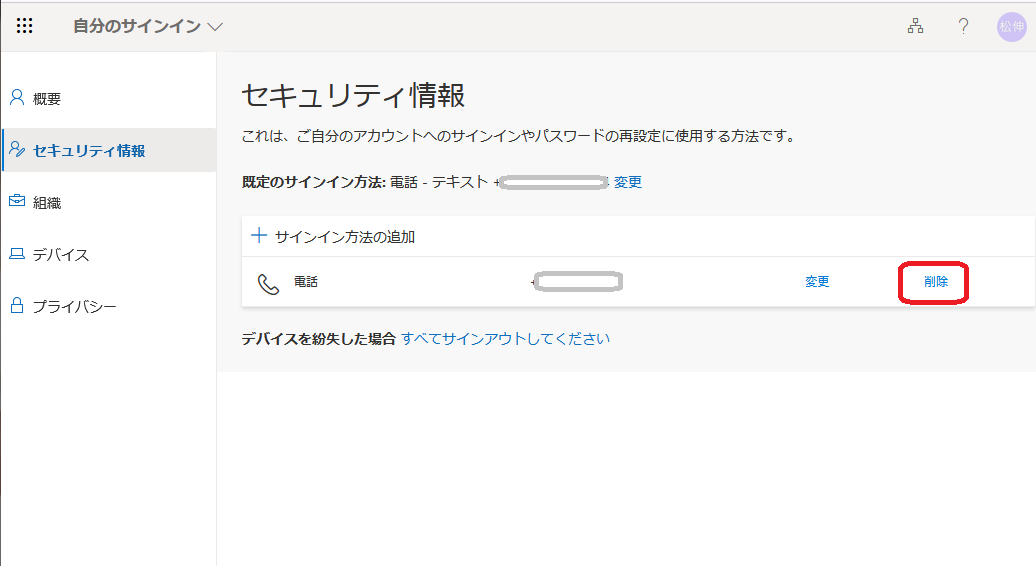
6. Removal of Two Factor Authentication
- This is a method of deleting past settings, such as when you change your phone number, for example,
when you switch to another company. If you delete all settings, you will need to register again the next
time you sign in.
Launch Edge or other browser and click, access https://mysignins.microsoft.com/security-info and sign in.
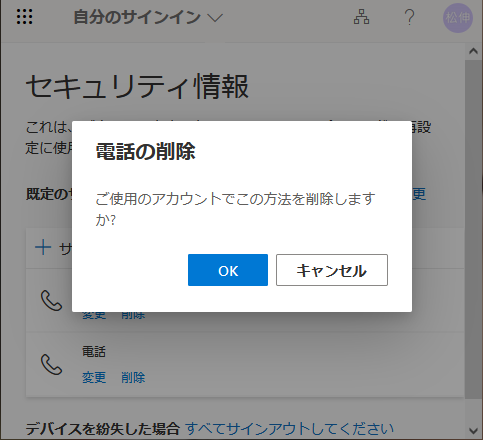
- On the right side of the screen, click on the Delete item.
- You will be asked "Do you want to delete? You will be asked, "Do you want to delete?" Press OK to
delete the file.
7. How to set up with Microsoft Authenticator
Preliminary preparations
Install Microsoft Authenticator (Microsoft Authenticator app) on your phone.
- For Android users, Microsoft Authenticator. or search for Microsoft Authenticator in Google Play and install it!
- iPhone users can click Microsoft Authenticator or go to the Apple Store Search for Microsoft Authenticator and install it.
- After signing in to Teams, click on Join Teams / Teams. For more information on how to use Teams, see
Mie University Office 365 - How to use
Teams -
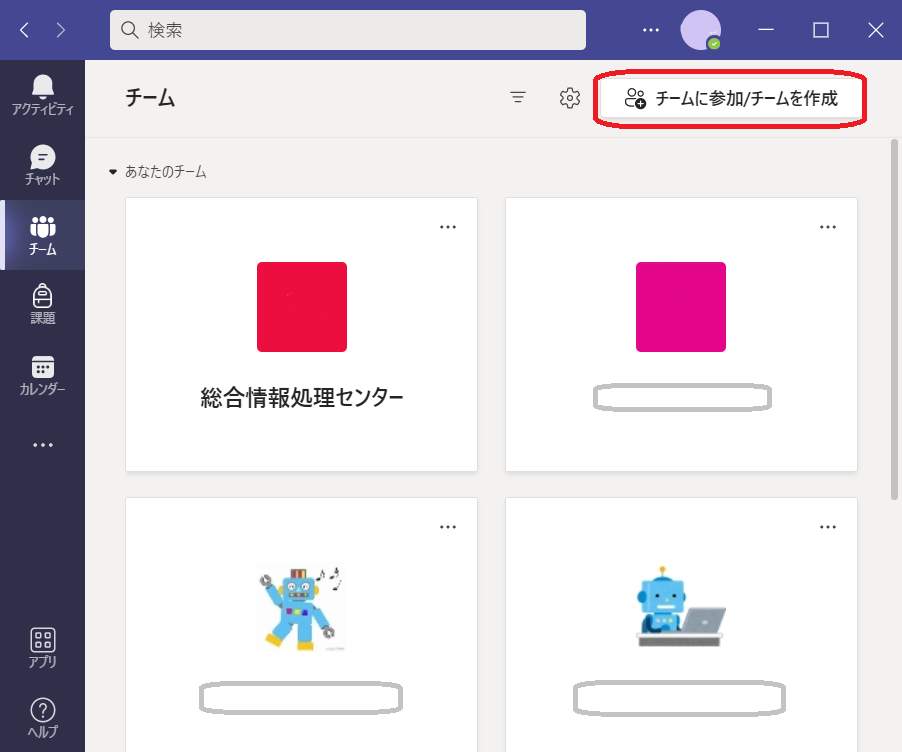
- Search for "Two Factor" to find the Two Factor Authentication team. Join the team!
※Please note that "2-element" or "2-element" will not be searched.
- After waiting for a while, the authentication screen will appear. Enter your unified account password
and sign in.
If you wait and it does not appear, go to the Office 365 portal site and sign in.
- You will see "More information required." Press "Next."
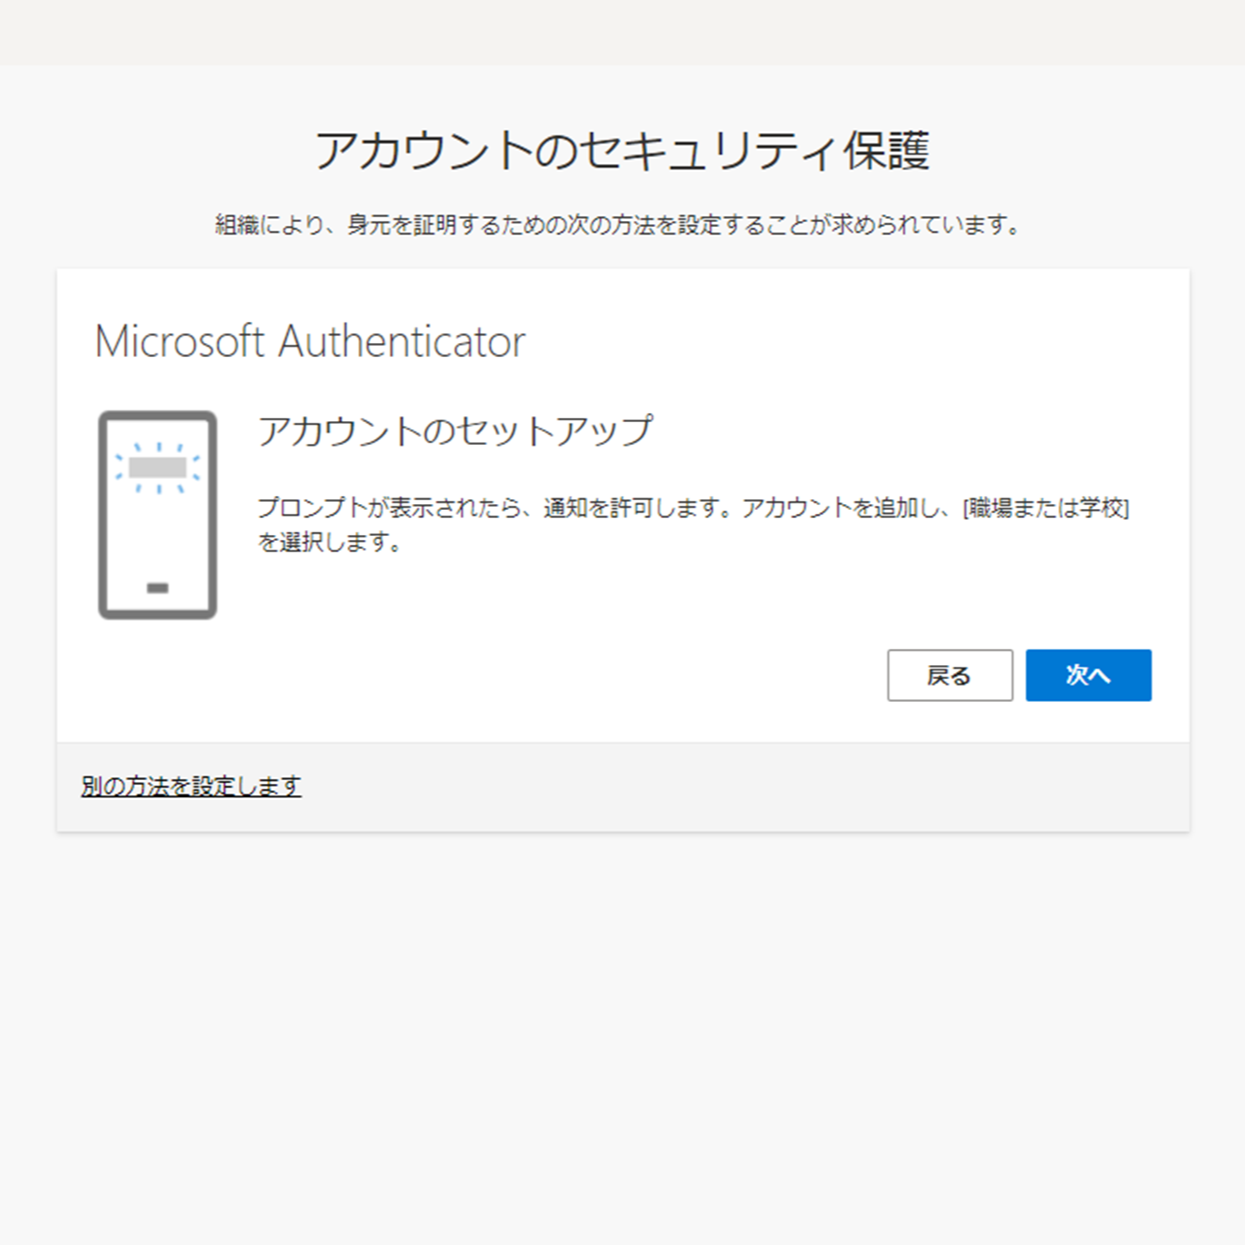
- You will see "Account Security Protection." Click "Next" to proceed to the application-based
authentication setup.
If you wish to authenticate by another means, such as phone number, click on "Set up another method.
This section describes the authentication settings using the authentication application.
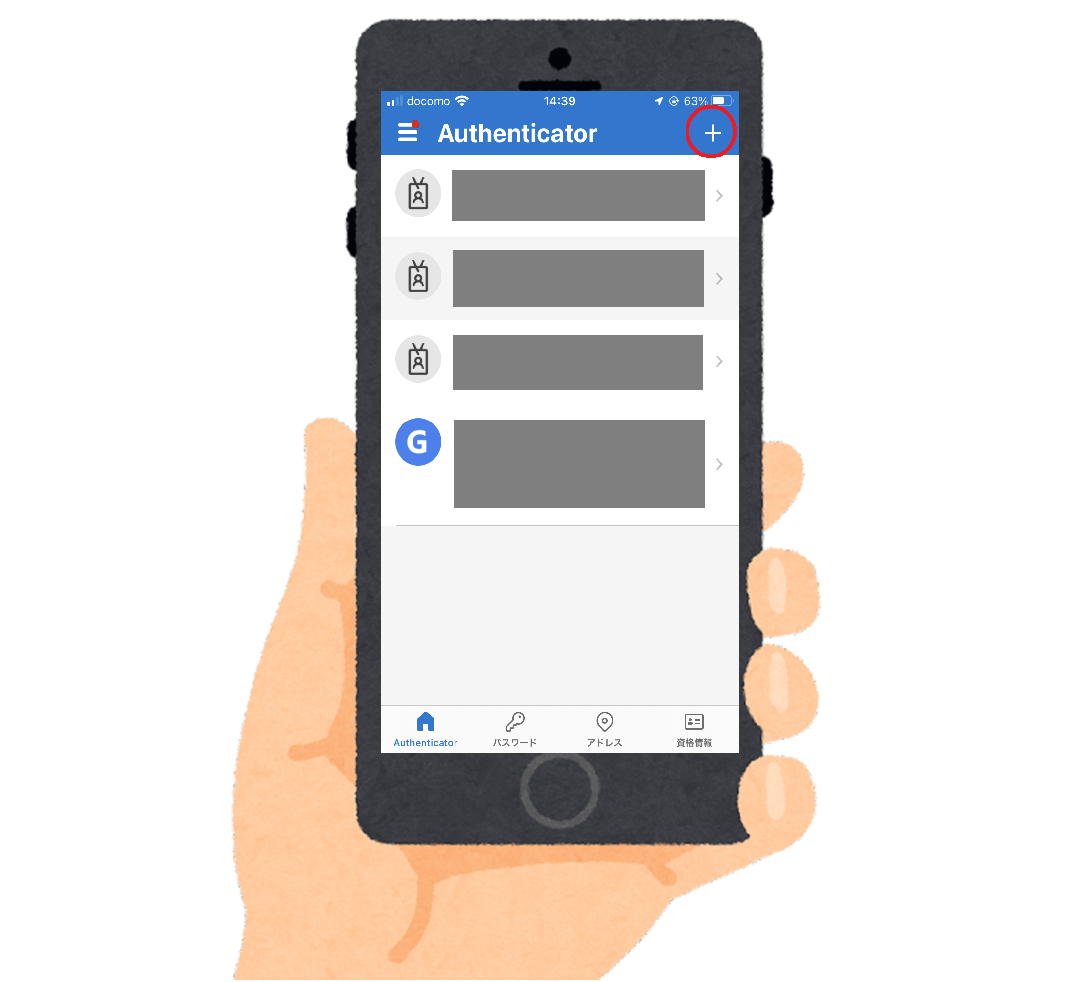
- When you get to the "Account Setup" screen, launch the authentication application (Microsoft
Authenticator) on your phone.
If you are prompted to allow notifications at startup, do so.
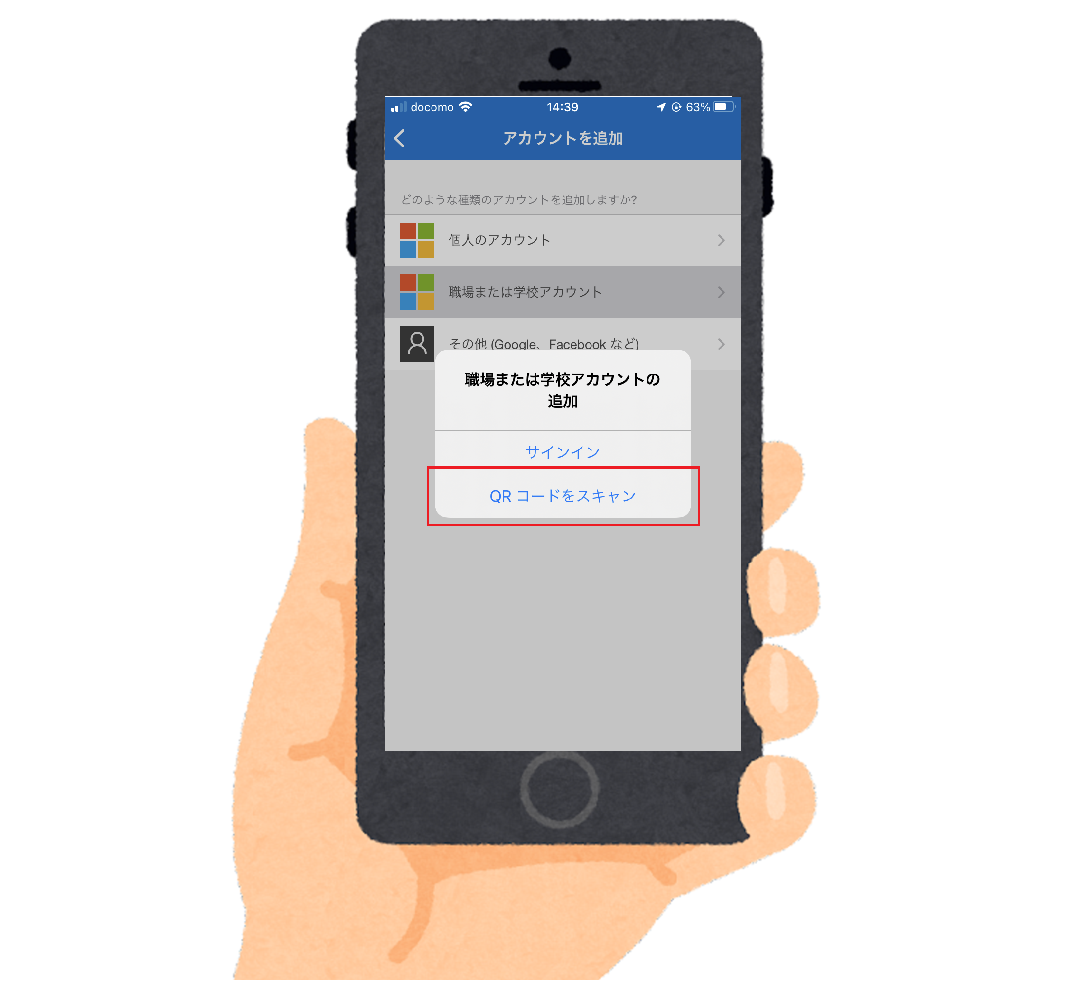
After launching, tap the "+" button in the upper right corner of the application screen and select "Work or School Account".
After making your selection, click "Next" on the "Account Setup" screen.
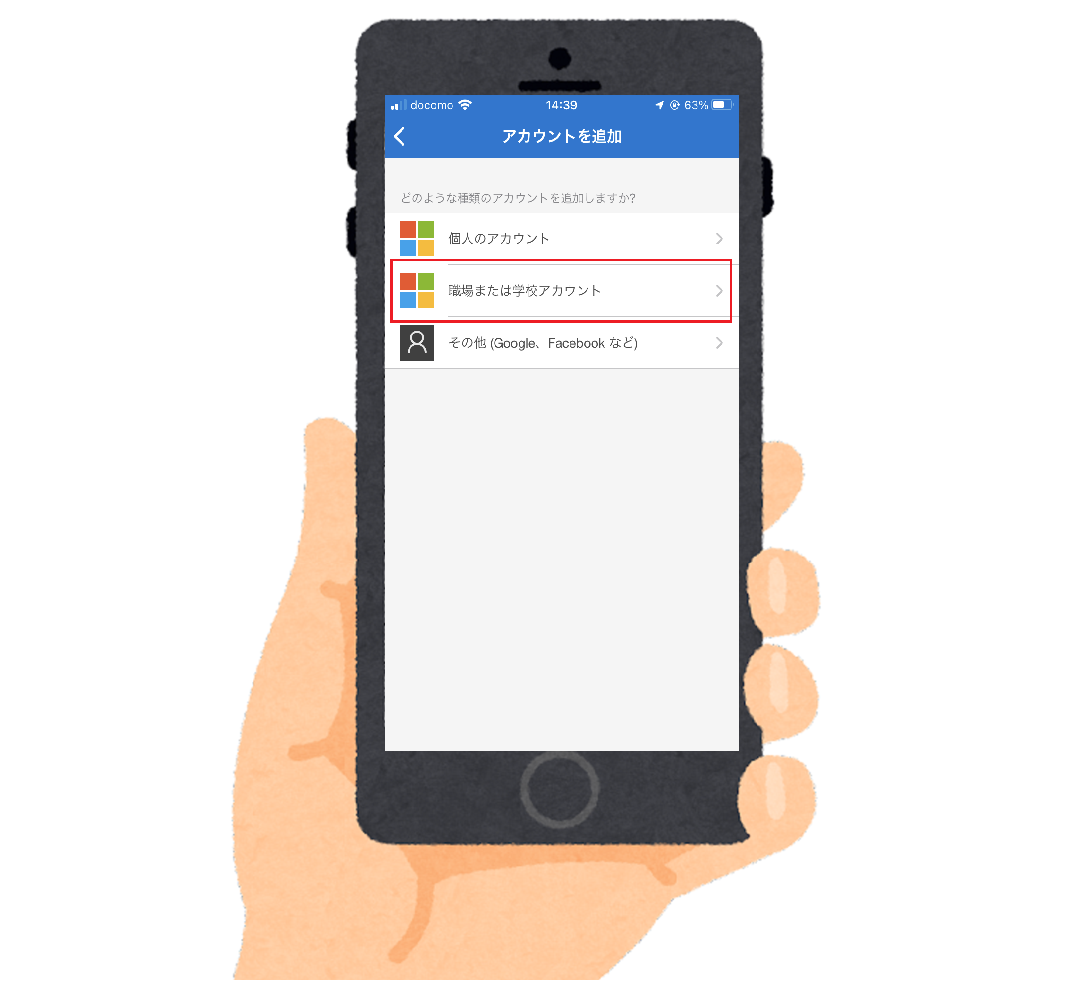
- Select "Scan QR Code" in the application, scan the QR code, and your account will be added to the application.
After adding, click "Next.
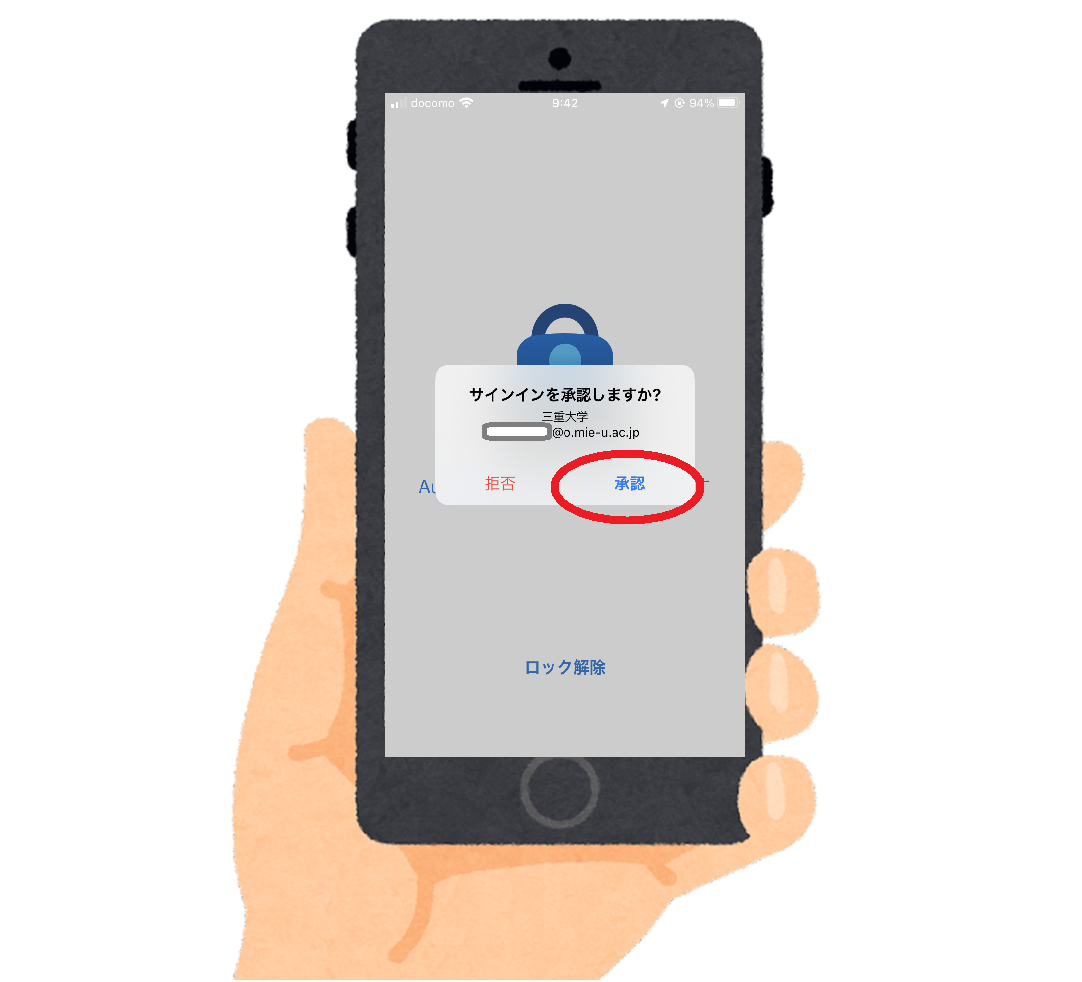
- You will get a notification on your phone's app that says, "Do you want to approve your sign-in?" and select "Approve".
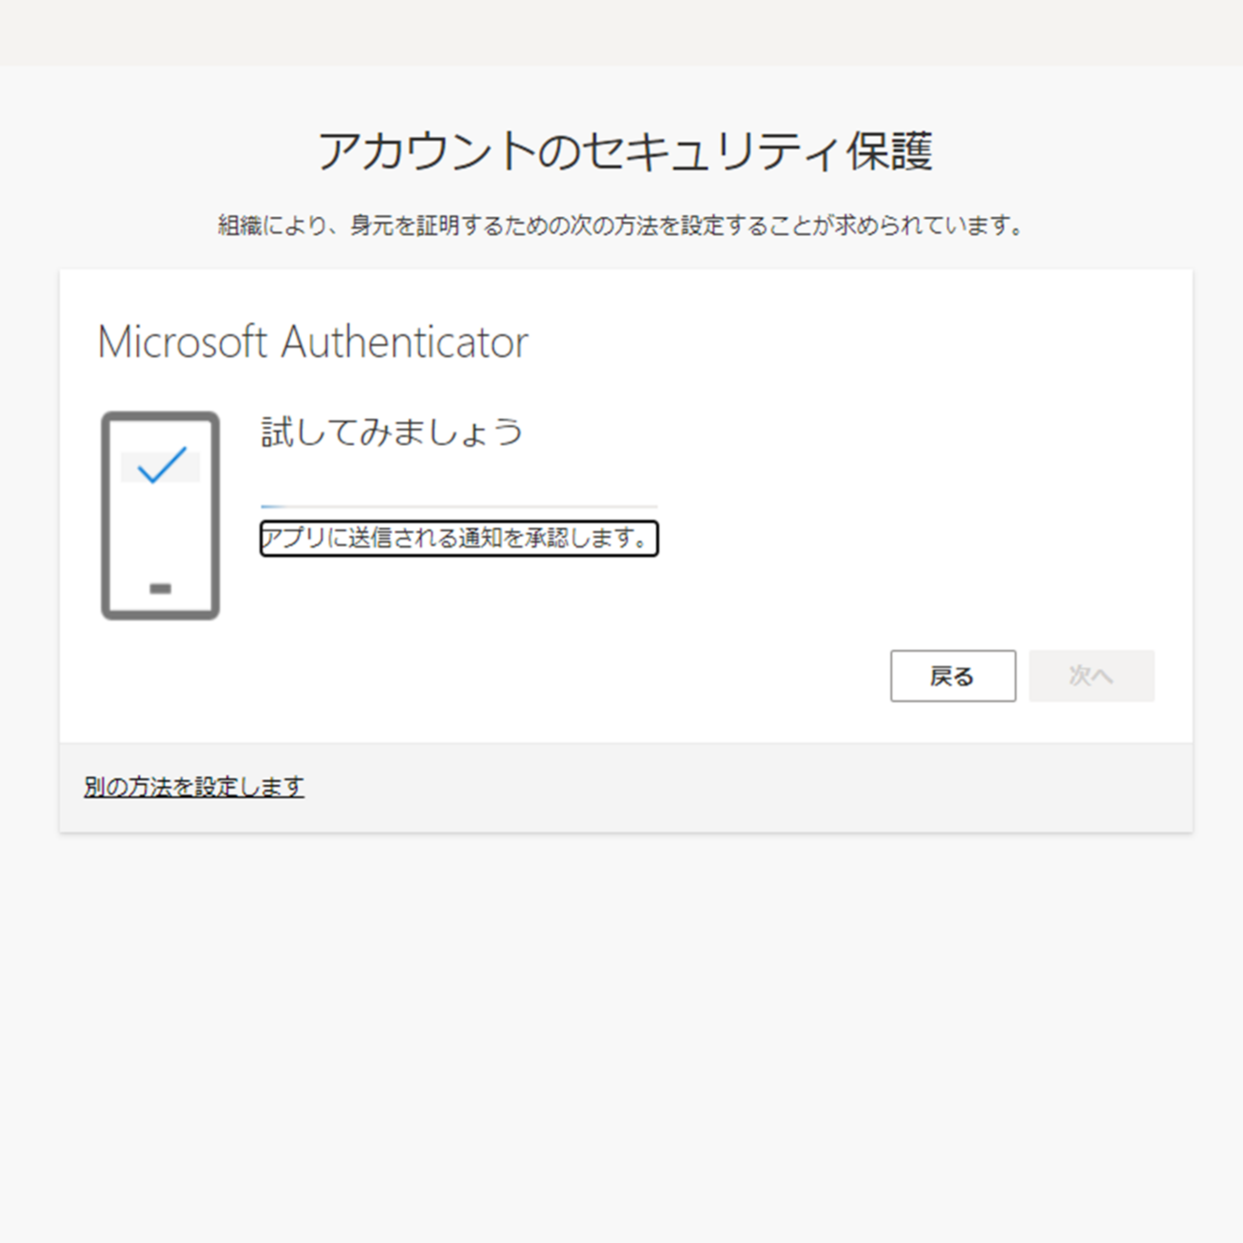
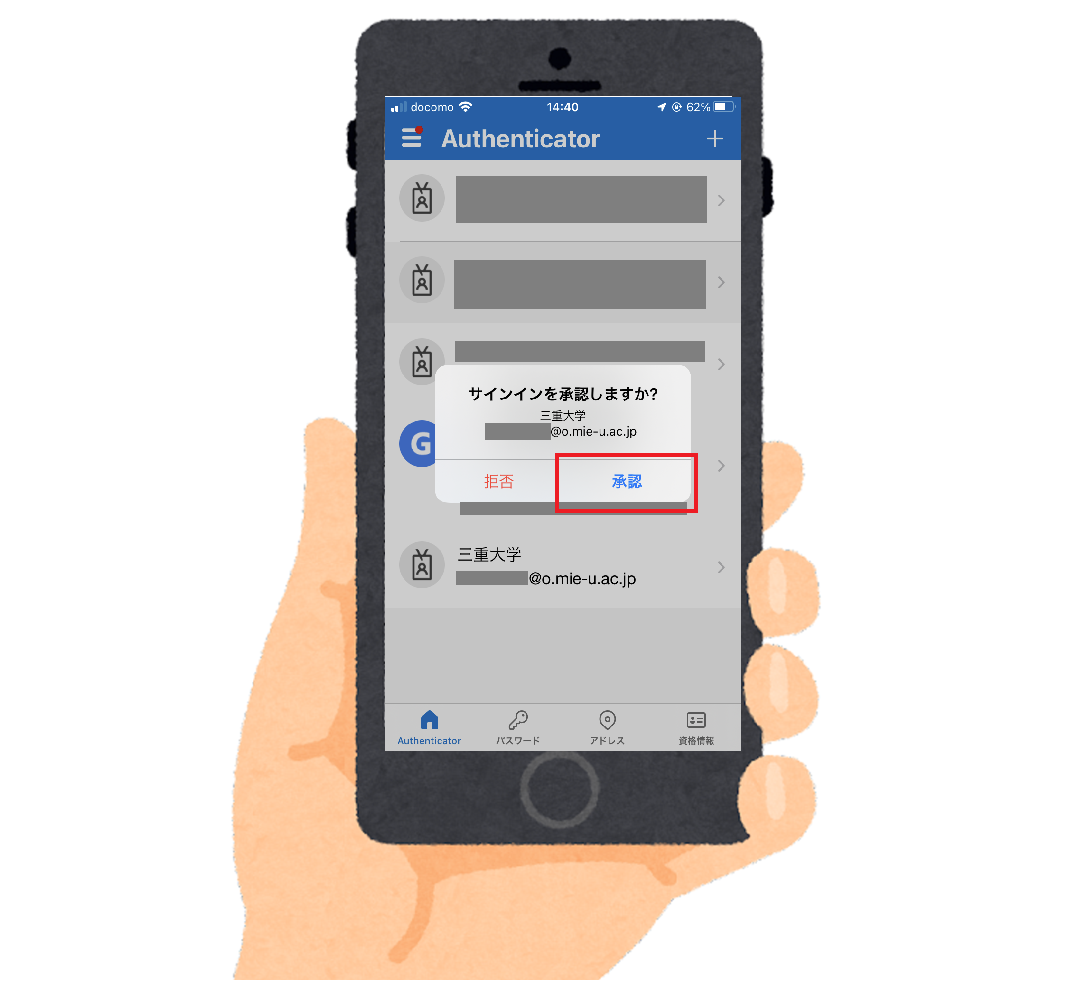
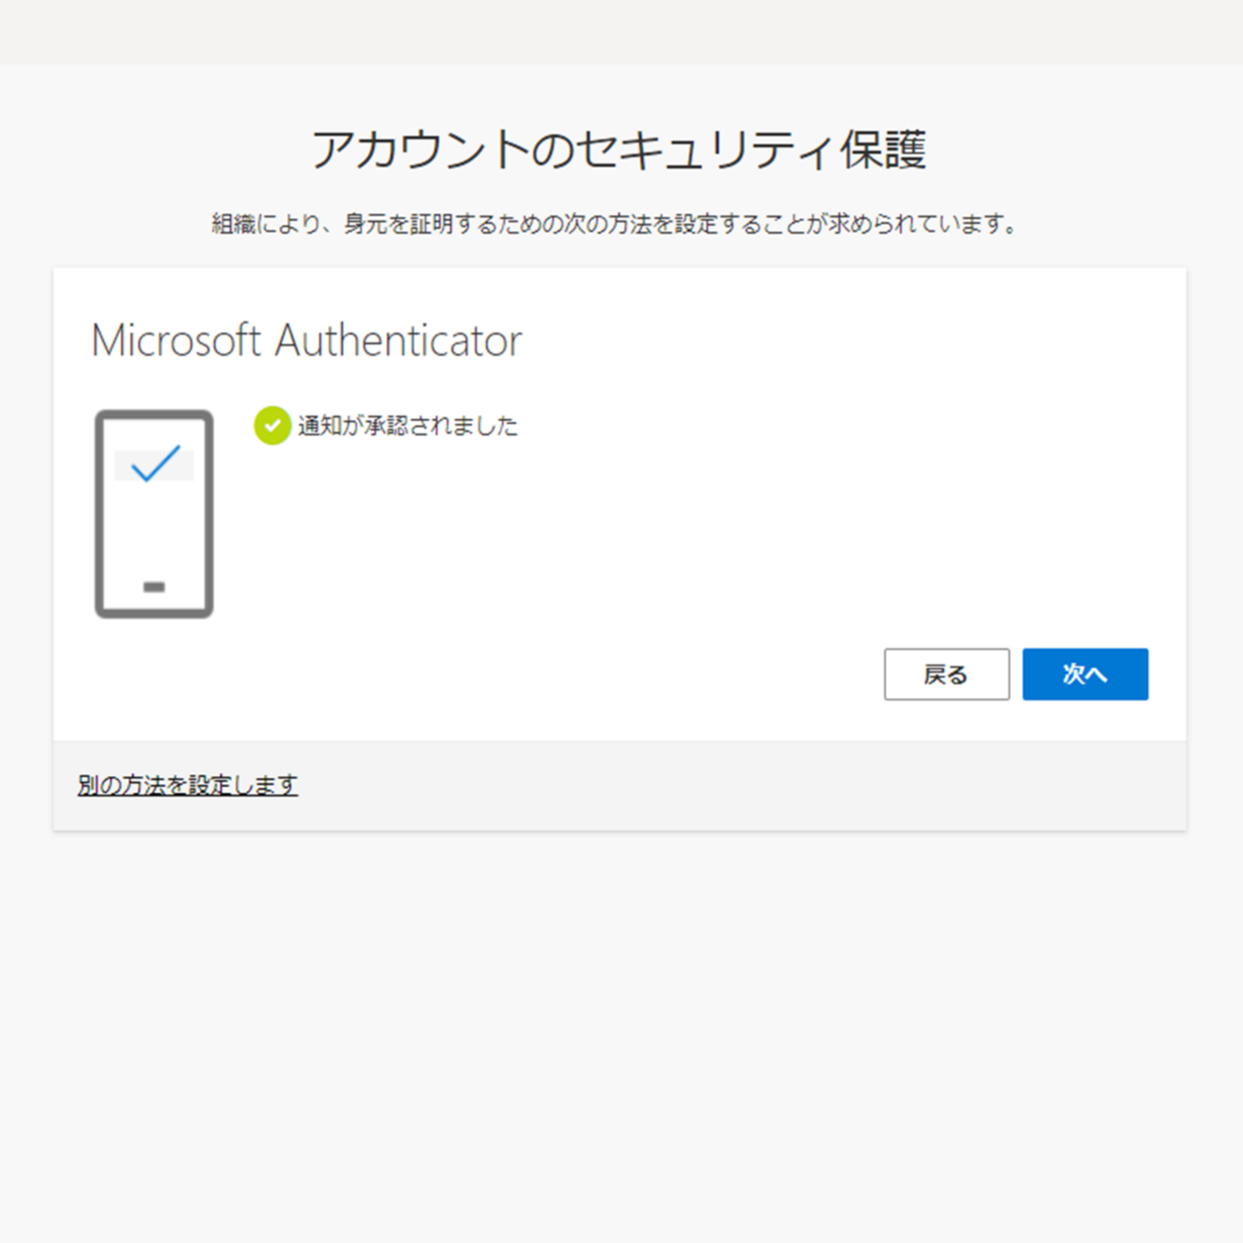
- If the approval is successful, "Notification approved" will appear on the settings screen, and click "Next".
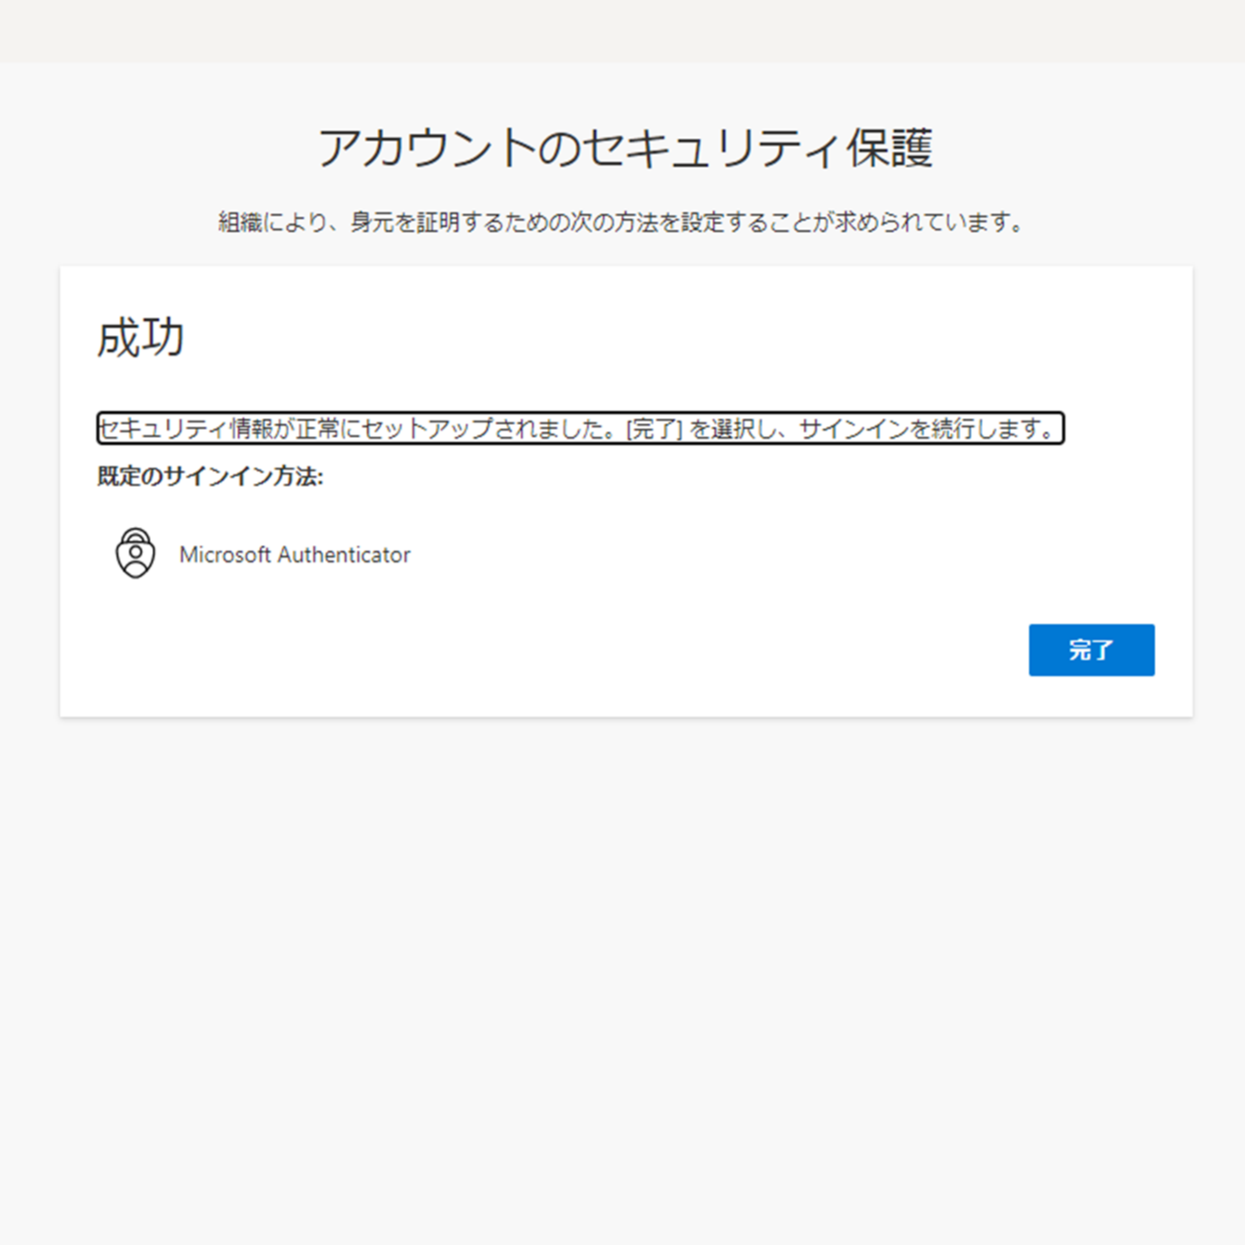
- Click "Done." This completes the setup of the authentication application.
- After clicking "Done," if you see a screen like the one below, select "No, I will only sign in to this app.
If you click "OK" with "Allow organization to manage devices" checked, you may get the error "CAA50024".
If that happens, please visit this page.
- Select "Scan QR Code" in the application, scan the QR code, and your account will be added to the application.
8. Flow of logging in with Microsoft Authenticator
- After signing out of Teams, enter your password and try signing in again.
- The "Approve sign-in request" screen will appear and a notification of approval will be sent to your
phone.
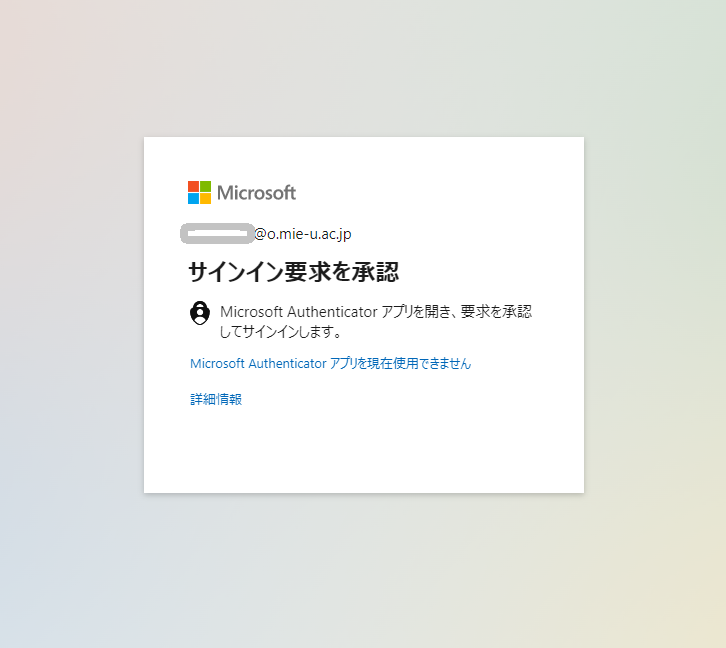
- Select "Approve" in the notification sent to your phone.
- If a screen like the following appears, select "No, I will sign in only for
this app.
If you click "OK" with "Allow organization to manage devices" checked, you may get the error "CAA50024".
If that happens, please visit this page.
- I was able to sign in.
9. About when you change your smartphone
If you are using Microsoft Authenticator, you will need to configure the authentication app on your new smartphone.
If you have your old smartphone, or if you can perform authentication using a device other than your old smartphone
From the steps in "5. Additional registration or modification of two-factor authentication" above, select "Authentication app" as the addition method, Please make new settings on your new smartphone.
Once you have completed the settings on your new smartphone, please delete the authentication app settings on your old smartphone by following the steps in "6. Removal of Two Factor Authentication" above.
If you don't have your old smartphone
If you do not have your old smartphone at hand due to malfunction or loss, and you are unable to authenticate with anything other than your old smartphone,
Please contact Center for Information Technologies and Networks support to reset your two-factor authentication settings on the administration screen.