Printing from Your Own PC - Windows
1. Printer setting
Register the printers
Please do the following work after connecting to the campus network.
- Please prepare your unified account.
- Download the installation batch from the following.
Please click to download the installation batch of the printer you want to use.- 1st classroom
- 2nd classroom
- 3rd classroom
- 4th classroom (2 printers)
- University Library 1F
- University Library 2F (2 printers)
- MEIPL
- Right-click on the downloaded ZIP file, select "Extract All", and extract the file. The save destination can be specified arbitrarily.
- Open the folder created by decompressing and double-click the "IPP _ ***.bat" file to execute it.
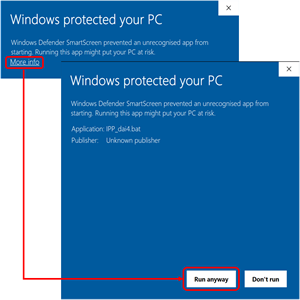
At this time, if a warning message is displayed by Windows Defender SmartScreen, click "More info" → "Run anyway".
- When "User Account Control" is displayed, click "Yes".
- The setup screen of the printer driver is displayed and installation starts. Please wait as it is.
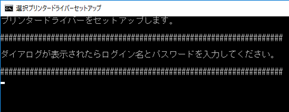
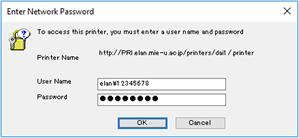
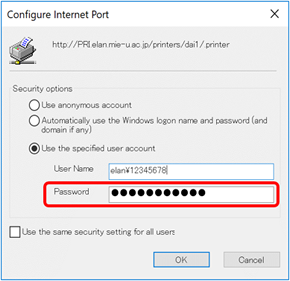
- "Enter Network Password" screen is displayed. Enter the following, and click "OK".
User Name : elan\User ID of the unified account
Password : password of the unified account
*If you execute the installation batch of 4th classroom and University Library 2F, the above steps 5-7 are repeated twice. - When the setup screen is closed, installation is completed.
- Confirm that the printers is installed.
Click the Windows mark at the bottom left of the screen, open "Windows System" → "Control Panel", and click "Devices and Printers".
If installation fails
If the installation is not successful, please check "Setting up the IPP printing client" below.
2. About printing
Network connection
When printing from your own PC, please confirm that it is connected to the campus network.
You can not print from outside the campus network.
Print point
As with systems for education, color printing consumes 3 points, black and white printing consumes 1 point.
Even on a character only, if you print with color printing, 3 points will be consumed, so please check the color / black and white specification before printing.
The default setting is black and white printing.
3. Change password
If you change the password of the unified account, you will need to change the password set for the printer.
You can not print from your own PC unless you have changed the password.
- Click the Windows mark at the bottom left of the screen, open "Windows System" → "Control Panel", and click "Devices and Printerss".
- Right-click the printer that setting you want to change, and select "Printer Properties".

- Open the "Ports" tab and click "Configure Port" button.
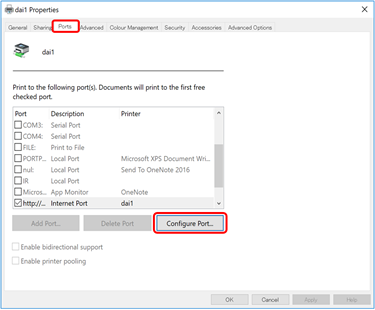
- In the "Password" field, enter the changed password and click "OK".
- Click the "OK" button on the property screen to apply the setting.
- Setup is completed. Please confirm that you can print.
4. System requirements
This printer driver is compatible with the following Windows OS.
Even if it is Windows, it does not correspond to the edition which is not mentioned.
Supported OS of the printer driver
- Windows® 7 Home Premium SP1
- Windows® 7 Professional SP1
- Windows® 7 Enterprise SP1
- Windows® 7 Ultimate SP1
- Windows® 8.1
- Windows® 8.1 Pro
- Windows® 8.1 Enterprise
- Windows® 10 Home
- Windows® 10 Pro
- Windows® 10 Enterprise
- Windows® 10 Education
*Both 32bit and 64bit version are supported.
5. Setting up the IPP printing client
Setting
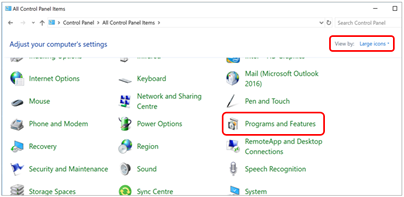
- Click the Windows mark at the bottom left of the screen and open "Windows System" → "Control Panel".
- Click "Programs and Features".
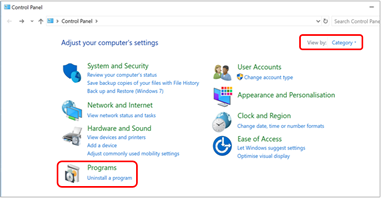
If "View by" of the Control Panel is "Category", click "Programs".
[Large icons]
[Category]
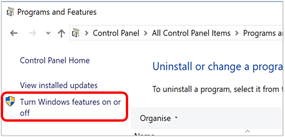
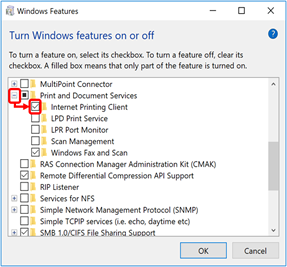
- Click "Turn Windows features on or off".
- Check "Print and Document Service" → "Internet Printing Client", and click "OK".
- Installation of the IPP printing client is started.
- When the installation is completed, a message indicating that the change is completed is displayed.
Click "Restart Now" to reboot the PC. - After the restart is completed, you will register the printer.